BMW saltracer gets a carbon bum

II’m 6″ tall. With my chin on the tank, my arse ends up a couple of seconds behind! The seat will be quite long as a result and the rear-sets even further aft.

After playing around with pencil and paper getting proportions correct, I built a CAD 3D model, sliced it like a piece of virtual bread every 16mm, then printed and pasted these offsets onto 16mm customwood. Some jigsawing and glue created what looked like a wasps bum. When sanded smooth to the glue lines, the intended shape emerged.

My friends Peter and Steve of Applied Composite Technologies made a female mold from my ‘plug’ then they laid it up with carbon/epoxy to create the finished part. The pointy end was taken off and some curves introduced so that it looked the business on the salt racer.


Mal Hewett’s Vincent salt racer

S Self built, Vincent based, he’s scooped a couple records in the Vintage class at both Lake Gairdner and Bonneville. Love the man and his machine.

ABC did a short piece on him:

https://open.abc.net.au/explore/64721

keeping the oil kule

Picture this: An air cooled 1000cc motor screaming it’s heads off at 2000 RPM past its stock red line in the heat of a parched salt lake in the middle of a desert.  And how about the head in the helmet? Need to avoid heat stroke in any of these three heads!

I’m using a Moteren Israel sump extension with a screw on oil filter. This is a very handy gadget as it has ports to add an external oil cooler. The sump extension is vital, not necessarily to increase oil quantity but to increase the sump volume to aid crank case breathing. The stock breather will also be enlarged.

Scored a hand-me-down oil cooler from the triumph salt racer that my shed mate Ross is building. A couple brackets and some plumbing later:

As for the head in the helmet…..


Airhead salt racer rear suspension geometry

Here’s a quick rundown of the process I went through in sorting the rear suspension geometry of the salt racer.

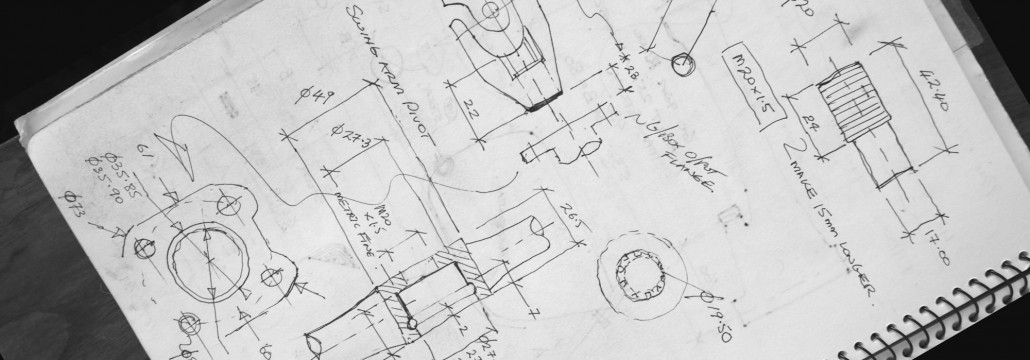
First task was to calculate the shock specifications. I started manually calculating these with the help of a couple texts including Tony Foale’s tome on the subject: Motorcycling Handling and Chassis Design. Even though the salt racer’s geometry is relatively simple compared to modern sports bikes with all their tricky linkages, I soon gave up and bought Tony’s program: Motorcycling Analysis which is basically the book in program form – this made things very much easier with the luxury of being able to easily experiment.  Highly recommended. www.tonyfoale.com

I’m not going to describe the process in detail but after inputting the geometry of the airhead frame + oilhead swingarm, I arrived at the following specifications for the shock (which ended up being similar to the stock R1100RT shock):

Free length: 340 (fully extended)
Travel: 50mm
Spring rate: 190N/mm
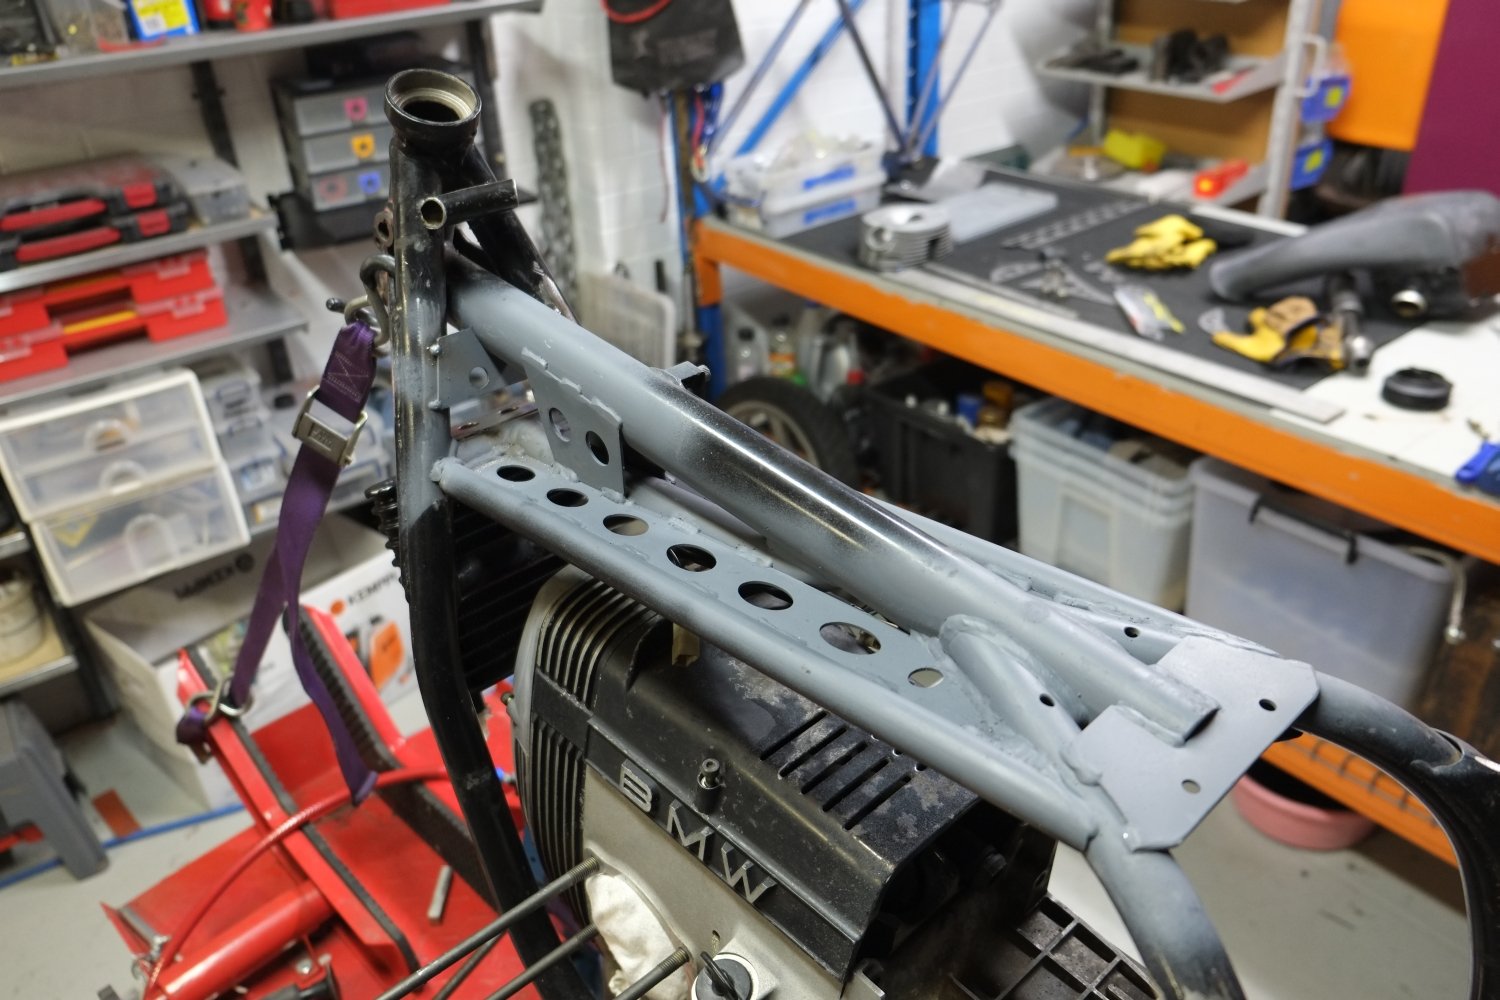
Lower clevis to suit the R1100 swing arm.

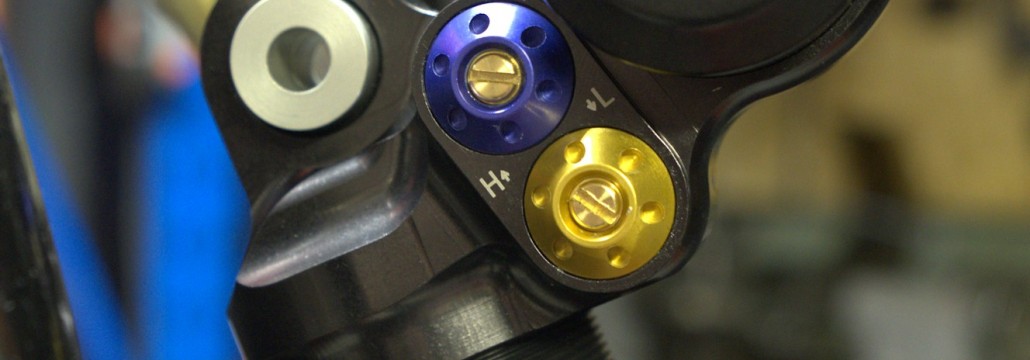
I opted for Hyperpro and soon after, a very sexy looking piece of Dutch bling landed on the doorstep complete with damping adjust both ways and ride hide adjust.

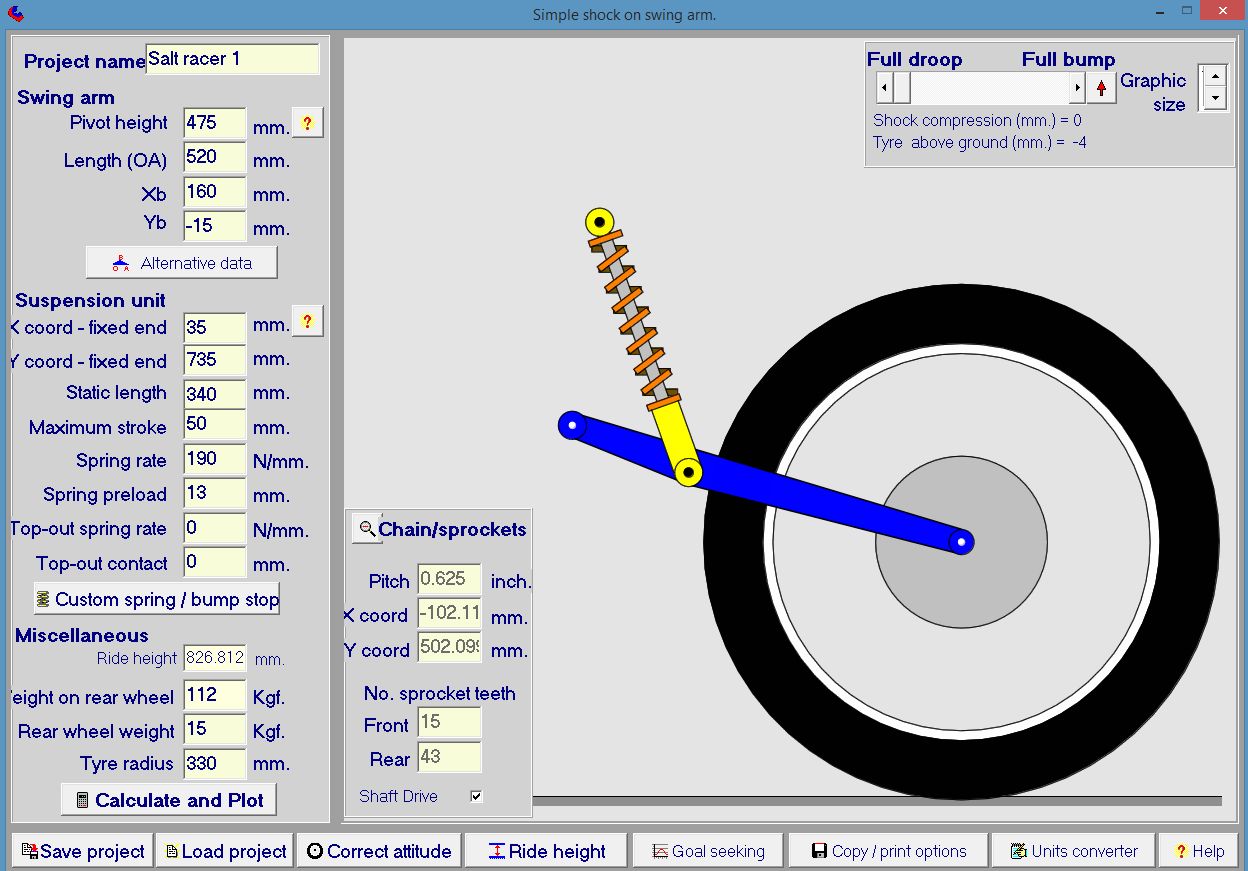
The program was used to predict the behavior of the system and tweek certain parameters so that ideal suspension characteristics were obtained – in this case we were shooting for a total sag (bike + Rider) of between 25-30mm with a spring preload of no more than 15mm. Most the program parameters as defined in the program’s set up page below are locked in:  The oilhead swing arm dimensions cannot be changed, nor can the spring specifications. The only parameters that can be changed are the ‘X coord’ and Y coord (which locate the top fixed end of the shock) and the spring preload. At this point we are mainly interested in the X coord and preload. The X coord is the horizontal mounting position of the shock in relation to the swing arm pivot.  I took an educated guess at the back wheel load at 112kg with me as rider.

A few button presses revealed that a X coord of 35mm combined with a spring preload of 13mm gave a total sag of 28mm. You can see the 35mm of X coord in the scaled graphic:  the top end of the shock is just behind the swing arm pivot. A spring preload of 13mm is a little on the high side for this particular spring. I could have reduced the necessary spring preload to get the target sag by pushing the top of the shock futher behind the swingarm pivot e.g. X coord of 40 or 50mm but there were other reasons why this was not so practical including complicating the mounting arrangement to the frame. So a X coord of 35mm was settled upon.   Now the Y coord could be tweaked, but this was done on the bike with shock attached to swingarm – more of this later.

Here’s the setup page of Tony’s program showing all the vital suspension stats of the salt racer. BTW, this is only the rear suspension part of the program. You could go on to model the entire suspension behavior of a bike if you so wished.

Tony Foale motorcycle setup page


The following is one of the many graphs that Tony’s program spits out. It shows shock displacement V’s wheel movement. The point to note is that from a completely unloaded state, the sag under full load (rider plus bike) is 28mm (vertical black line). Remember, nobody has sat on a bike yet, we are using the program to predict what the suspension will do in order to best locate the fixing point for the top end of the shock to the frame.


tony_foale_B


Another interesting graph is the effective spring rate measured at the wheel or ‘wheel rate’ Notice that even though the spring has a linear rate, the effective wheel rate is progressive ranging from approx 12 – 18 N/mm. This is the reason that people shouldn’t blindly ‘upgrade’ their linear springs to progressive rate springs. The suspension geometry may already be designed to obtain a progressive effective rate at the wheel with a linear spring. This is particularly the case for modern bikes with complex suspension linkages.


tony_foale_C


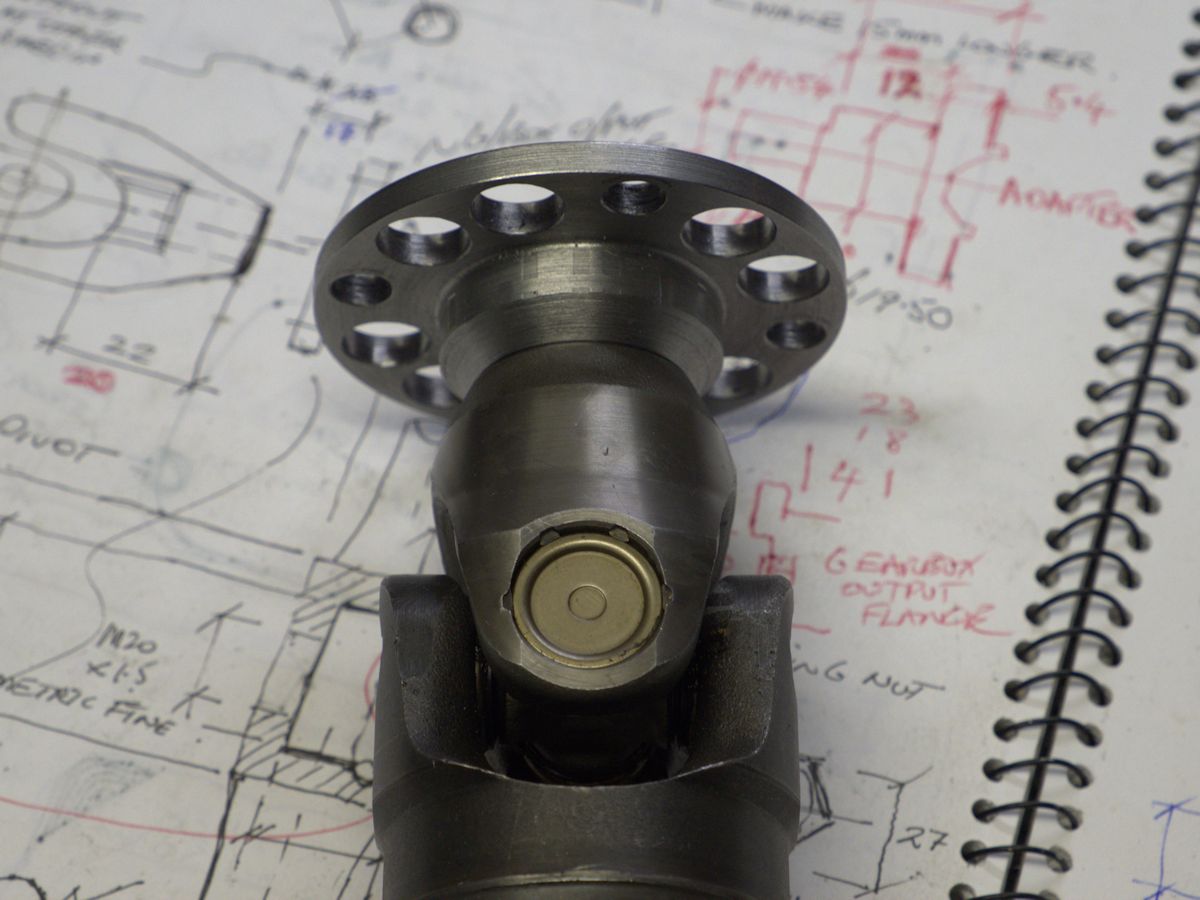
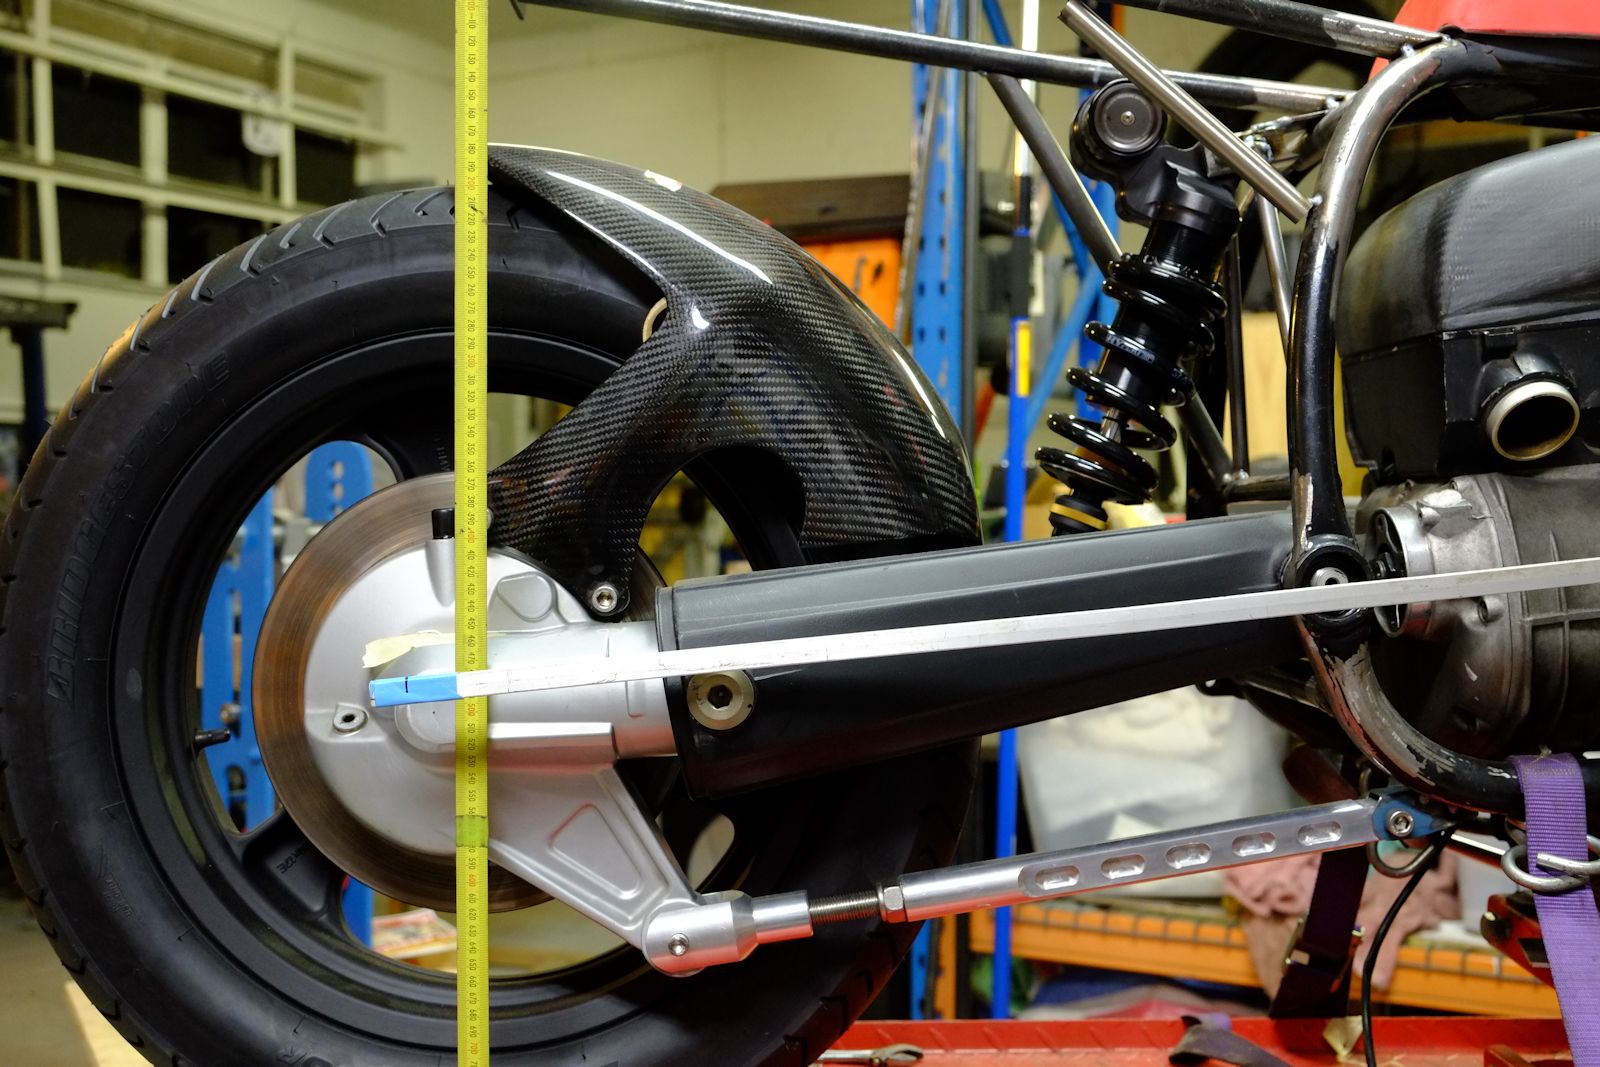
So,  having pegged the X coord at 35mm aft of the swing arm pivot, next job was to work out the vertical co-ordinate from the ground of the shock mounting position to the frame (Y coord). With a shaft drive, what we want to happen is this: when the bike is fully loaded, the gearbox output shaft axis, drive shaft axis and center of the rear wheel are all on the same straight line.  This ensures that any mechanical inefficiencies from universal joints operating at angles are dialed out – particularly for the salt racer where I’m chasing every microhorse. In reality, of course, this straight line position will become the median about which the suspension moves.

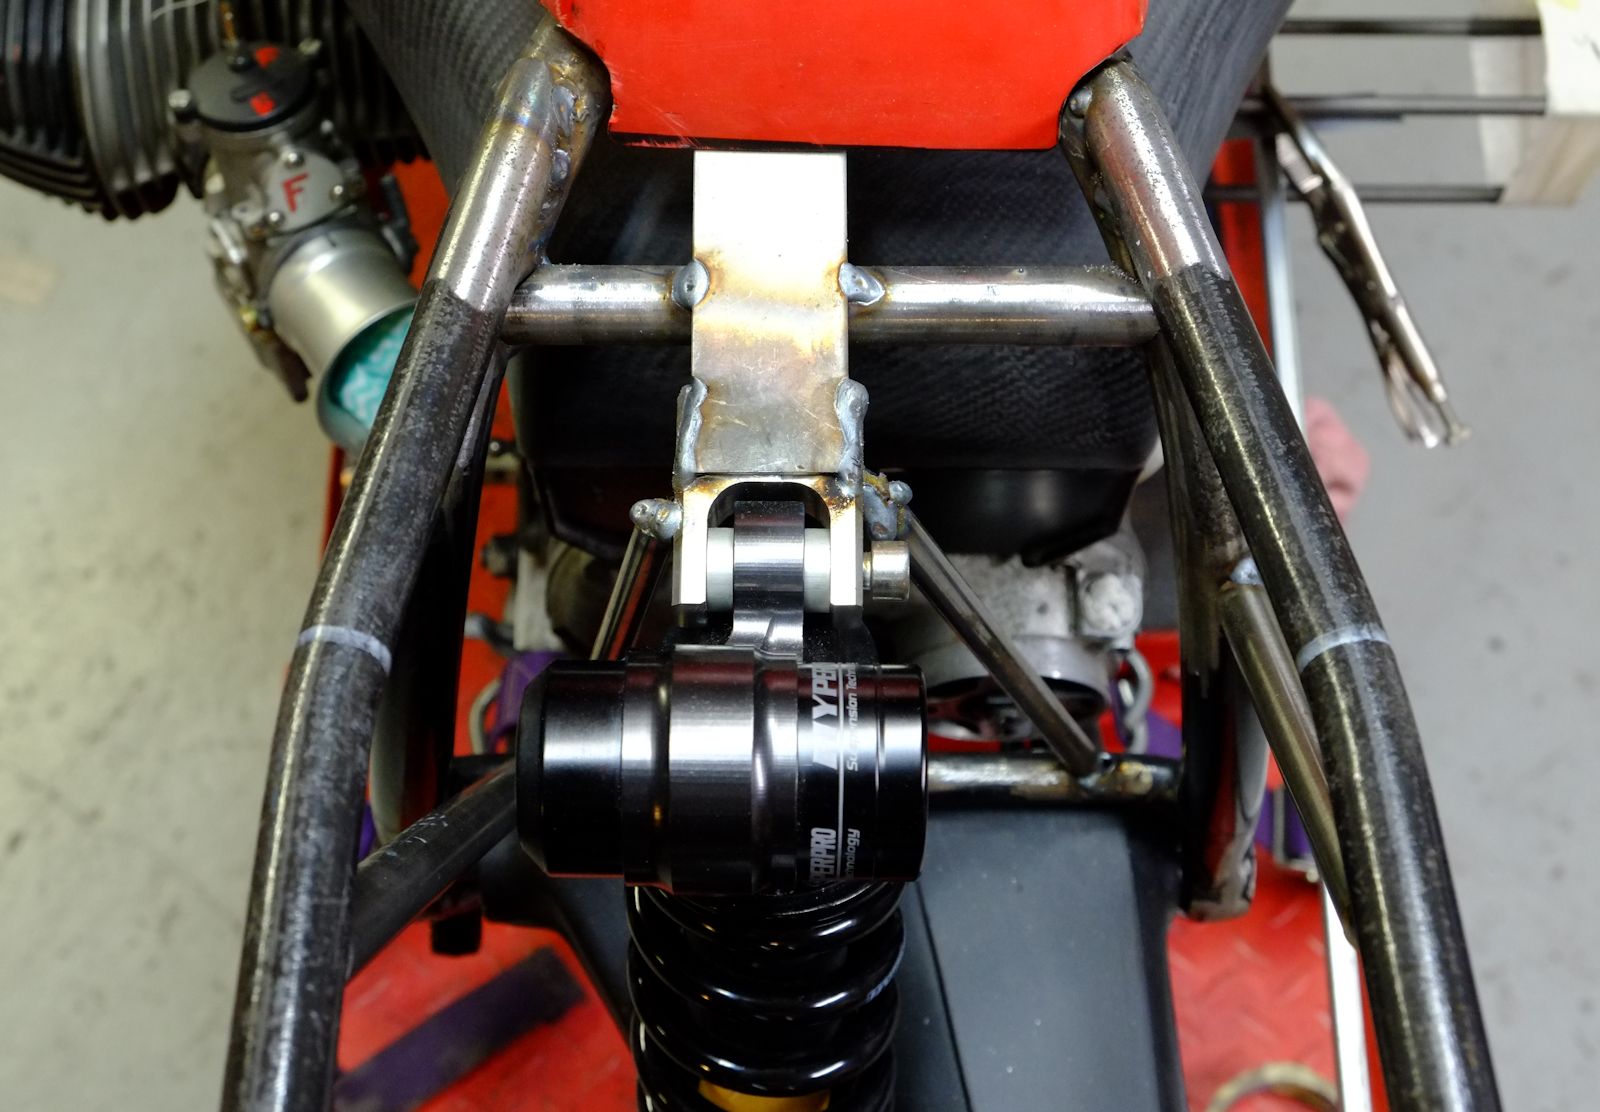
The image below shows the bike in an unloaded state (bike supported by jack under oil pan). The top edge of the bar with the blue tape marks the position where the drive train is perfectly aligned. With the top of the shock unattached, the bike was jacked up so that the center of the wheel was approx 25-28 mm below the top top edge of the bar. With top of shock 35mm aft of the swing arm pivot (Y coord) we now had the mounting position of the shock to the frame. I then mocked up a temporary mounting arrangement to lock the shock into this position. So, theoretically, with rider aboard the suspension should sag by the predicted 25-28mm at which point the drive train becomes aligned…


RearSusp_Mockup3


Now to test our predictions! With shock  firmly fixed to the frame I hopped on board. The measured total sag was 21mm. Not bad! I didn’t expect it to be spot-on because the bike was not complete and therefore under it’s finished weight. But it’s in a workable ball-park, there is enough adjustment in the system – adjustable torque arm and ride height adjust on the shock –  to tweak from this point so the next step is to remove the temporary bracketry and properly build in the top of the shock.  To be continued….


RearSusp_Mockup2


RearSusp_Mockup1

The business end

The frankenswingarm is finally looking like it should. Freshly powdercoated K100 17″ wheel; powdercoated R1100 RT swingarm; R1100S bevel drive; aftermarket carbon hugger for R1100S; Custom made adjustable torque arm. All grafted to the arse of an unsuspecting airhead.


frankenswingarm

Adapter flange twix airhead & oilhead

An adapter flange is needed between the output flange of the airhead gearbox and the drive shaft of the oilhead swing arm.

The adapter has a round spigot that is press fit into the female spline of the uni-joint on the R1100 drive shaft. Then the adapter will be welded to the uni-joint. The adapter is turned and milled from a piece of 75mm K1045 round bar.

flange_finished

flange_onBike


flange_ready

ready for welding

flange_weld1

flange_weld2

Fixing busted head fins

I got a couple heads from a 1989 R100GS for the salt racer. These are the ones to have since they have the so-called ‘D ports’ and have larger intake spigots since they take 40mm Bings. Got them cheap because one of them was busted up: 4 broken fins, a cracked 6mm hole that takes the rocker cover stud and a stripped spark plug thread. Other then that, they were  OK!

Aside from the broken fins, you can see where I welded up the rocker cover hole ready to face and re-drill:

Fin_weld3_M

The process involves TIG welding a bead on top of  the broken fin edge, then another bead on top, then another, then another….until a thin wall is built. Then into the mill to have the sides shaved to the correct thickness then another couple beads and repeat.

Fin_weld5_M

Fin_weld4_M

And after quite a few hours of welding, milling and filing:

Fin_weld6_M

Fin_weld1_m


salt racer rear end

airhead salt racer gets stiffed!

TThere’s a certain satisfaction in hacking tons of detritus and redundant bits off a frame – a bare canvas on which to plonk your own detritus and redundant bits!

Effectionally known as the ‘rubber cow’ the airhead frame is well known for it’s elastic nature.  BMW, in their wisdom, took the lengendary Norton Featherbed concept but rather than continuing each loop over the top and under the tank to the head stem, the BMW loops converge at a single spine that starts at the rear end of the tank and continues to the head stem.

This is where a good deal of the elasticity lurks…. and waits to be exited by the various pendulum effects from the front end and rear swing arm sections amongst other things.  I love a simplistic look but this can be hard to achieve. I could have gone the way that so many do and add tie rods that run from the head stem down across each side of the motor to the swing arm pivot area, but to my eye, this really stuffs up the simple lines of the bike.

I stood and stared and orbited around the frame for hours before settling on a stiffening plan and opted to horizontally stiffen the spine area and tie the top loops through to the head stem in a way that replicates the original Featherbed idea. Some gusseting of the head stem area was also added. Measuring and drawing in CAD for laser cutting makes things a whole lot easier.

airhead slat racer frame stiffening.


BMW airhead frame stiffenin

The oil cooler is a hand- me -down from my shed mate Ross’s Triumph Bonne salt racer build


laser_cut_frame_stiffening

laser cut stiffening plates


salt racer

We’re off to the big white dyno at Lake Gairdner for speedweek 2015.

The image is of Brett Destoop, fastest man in Australia…… and the world in the APSF-1000 category. 232 MPH (371 km/h) Lake Gairdner. Thanks to Simon Davidson  for allowing me to feature his image. You can see more of  Simon’s work at his website.

Skrunkworks will be campaigning Assalt – based on a 1987 BMW R80 with 1000cc  barrels and heads. We will be entering the 1000cc pushrod, unfaired (no streamlining), gasoline, category.

It’s hard to be realistic when your brain is pumped with the image of records shattering like glass as you scream across the salt… Thankfully, testosterone has settled back to default levels of egomania and sensible but vaguely irritating thoughts are invading like:  ‘Greater men and women have gone before…’  and   ‘this is going to be a 2+ year exersise...’

Update 03/07/2014: We are well underway working through the wish list put together in 2013 (below). Follow the progress on our blog or facebook or  instagram

  •  Gearing may be an issue: with a taller aftermarket  5th gear and the longest rear bevel drive available (32/11), we’ll probably need to spin the engine to 9000 RPM.
  • Cam: There was a time in the 1900’s that the only off-the-shelf ‘hot’ cam that you could get for an airhead was BMW’s own 336 ‘Sports’ cam. Things have evolved and now there are several modern grinds available – mainly out of Germany. I’ve got my eye on a 340 degree high end race cam…
  •  Crank will remain stock but balanced to lighter con-rods and light, high compression pistons. Static CR will be around 11:1
  • Lightened valve train throughout.
  • Inlet valves enlarged to 46mm.
  • Exhaust headers  enlarged to 41mm or more.
  • Heads ported to suit new valve sizes and dual plugged.
  • Dellortos – probably 40mm.
  • Modified oil pump to counter possible cavitation problems at high RPM’s
  • extend sump + oil cooler.
  • Wave tuned inlet and exhaust tract lengths.
  • Delete the alternator and run total loss ignition (starter can stay – weight is not such an issue since there is 3 miles to accelerate to speed)
  • Stiffen the rubber cow’s frame – no tank slappers at +200km/h please.
  • Extending swing arm to improve straight line stability.
  • etc. etc – lots of them!

So, there’s lots to do including building the dyno and dyno room and it remains to be seen how we’ll fair leading up to the Feb 2015 crunch time, but one thing’s for sure, it’s going to be fun!

Update: 03/06/2014: Frame stiffening completed

My shed mate Ross of Supacustom has hooked up with an old compadre of mine, Paul Chiodo of  Peter Stevens Motor cycles.The pair will be campaigning a Triumph Bonne of noughties vintage.  Ross will be responsible for modifying the rolling chassis while Paul and his cohorts will be herding a bunch of wild horses through to the back wheel via various highly modified mechanical contrivances.

We’ve got heaps of work to do including building a dyno and dyno room! So strap yourselves in for an epic ride of a blog and PLEASE, leave comments and suggestions – doG knows we’ll need them!!